Driving playback
Every decode node has one input that decides what you actually see: Frame. Nothing else about playback is configurable, because nothing else needs to be — the node loops, reverses and blends between frames on its own. All you supply is the number.
There are two ways to supply it, and they are genuinely different tools rather than a preference.
| In the material | On the CPU | |
|---|---|---|
| Where the clock lives | The material, from the engine's Time |
Your actor, published to the mesh |
| Setup | One node into Frame |
A component, plus one extra wire |
| Starts on its own | Yes, as soon as the mesh is visible | No — something has to drive it |
| Keyable in Sequencer | No | Yes |
| Scrubbing and retiming | No | Yes |
| Pause, reverse, ramp | Only what a formula expresses | Anything you can key or script |
| Per-instance timing | One extra node and a custom-data float | Free — each actor owns its own value |
| Cost | None | One tick per actor, two custom-data floats |
Rule of thumb: ambient motion uses the material clock, directed motion uses the CPU. A crowd of debris piles, a rippling flag, a looping machine — anything that should simply be running when the player arrives — wants the material. Anything a shot depends on happening at a particular moment wants the CPU.
Approach 1 — the material clock
Wire Time × FrameRate into the node's Frame input, using the FrameRate from the baked
asset. That is the entire setup.
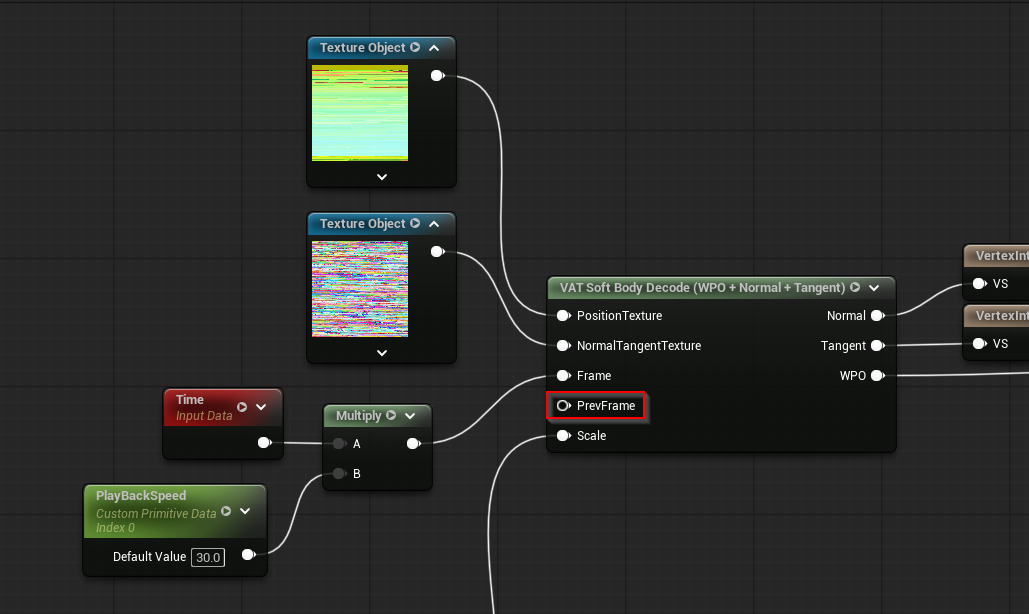
Above, the rate is a Custom Primitive Data scalar (PlayBackSpeed, defaulting to the bake's 30 fps)
rather than a constant, so each placed actor can play at its own speed without a material instance.
PrevFrame is deliberately left unconnected — highlighted in the screenshot — because the engine
already buffers Time.
- Looping is internal. You do not need
fmod, and drivingFramepast the last frame is fine. - Negative values play in reverse.
FrameRateis the rate the animation was captured at, so this stays the same whatever Frame Step the bake used — the node accounts for stepping itself and playback keeps its real-world duration.- Multiply
Timeby more or less thanFrameRateto play faster or slower.
Every mesh sharing the material plays in lockstep, because they share one clock. Custom Primitive Data breaks that up without a material instance per actor — either the rate, as above, or the phase:
Vary the offset across a crowd and they fall out of step; vary the rate and they drift apart over
time. Both are still the material clock — you are shaping it, not driving it — so nothing below
about PrevFrame applies.
Motion vectors are handled for you
The engine keeps a previous-frame copy of Time specifically so that vertex animation can report
motion. A Time-driven VAT produces correct motion vectors with no extra work, and temporal
anti-aliasing resolves it cleanly.
Approach 2 — driving Frame from the CPU
Use this when playback has to be directed: keyed on a Level Sequence track, scrubbed in the editor, started by gameplay, retimed, or paused. The frame number is computed on the CPU and handed to the material through Custom Primitive Data, which is per-actor and needs no material instance.
The VAT Frame Driver component is what carries it across. You never touch custom primitive data yourself — you drive one float on the component, and it publishes what the material needs.
- Add a VAT Frame Driver component to the actor and point Target Primitive at the mesh.
- Drive its Frame property — key it in Sequencer as a normal float track, or set it from Blueprint with SetFrame.
- In the material, wire Custom Primitive Data index 0 into Frame and index 1 into PrevFrame.
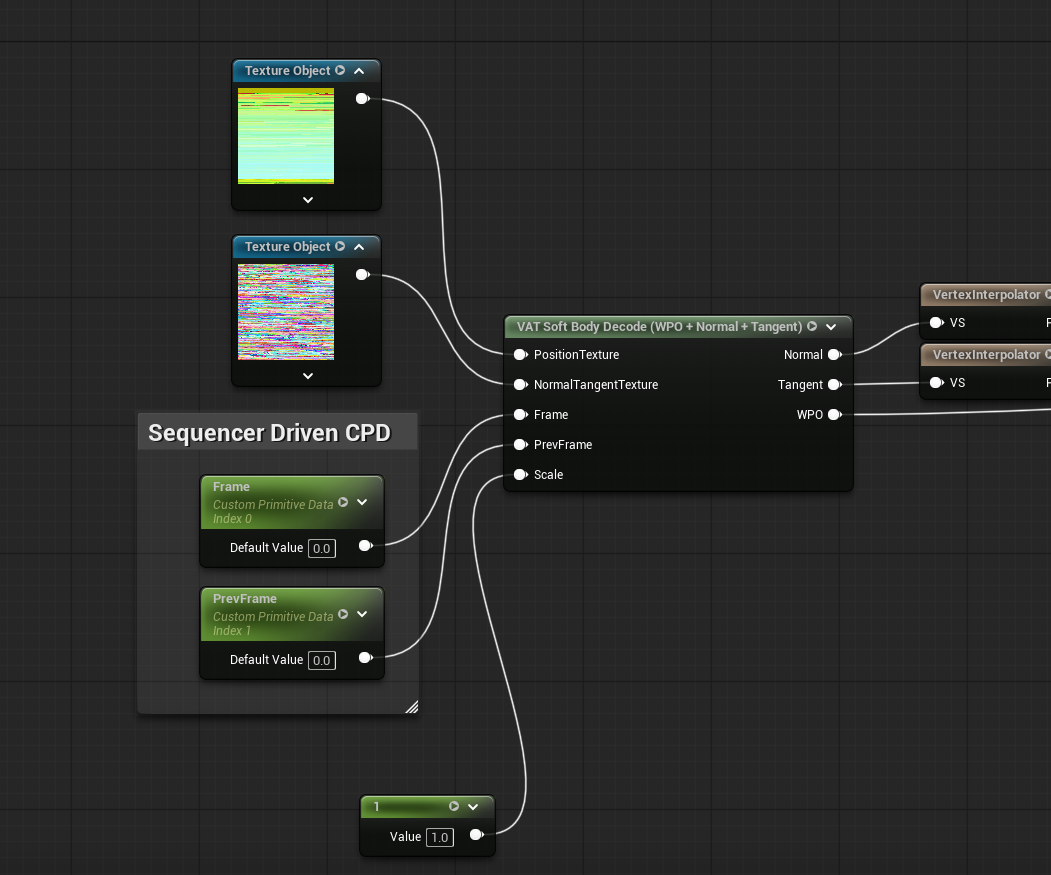
Do not key the custom primitive data values directly. The component owns both floats, and it writes them after the sequence has been evaluated, so they can never disagree with each other.
What to key into Frame
Frame is measured in frames, not seconds. The useful range runs from 0 to the asset's
NumFrames, readable on the baked data asset alongside its FrameRate; going past either end simply
wraps. Fractional values are blended, so the curve does not have to land on whole numbers — except on
Fluid bakes, which snap to whole frames because consecutive frames have different topology.
From there the curve is the performance:
| To do this | Shape the curve like this |
|---|---|
| Play once at natural speed | 0 → NumFrames over NumFrames ÷ FrameRate seconds |
| Play in slow motion | The same range over a longer time |
| Hold on a pose | A flat section |
| Play backwards | A descending section |
| Loop | Repeat the ramp; the node wraps on its own |
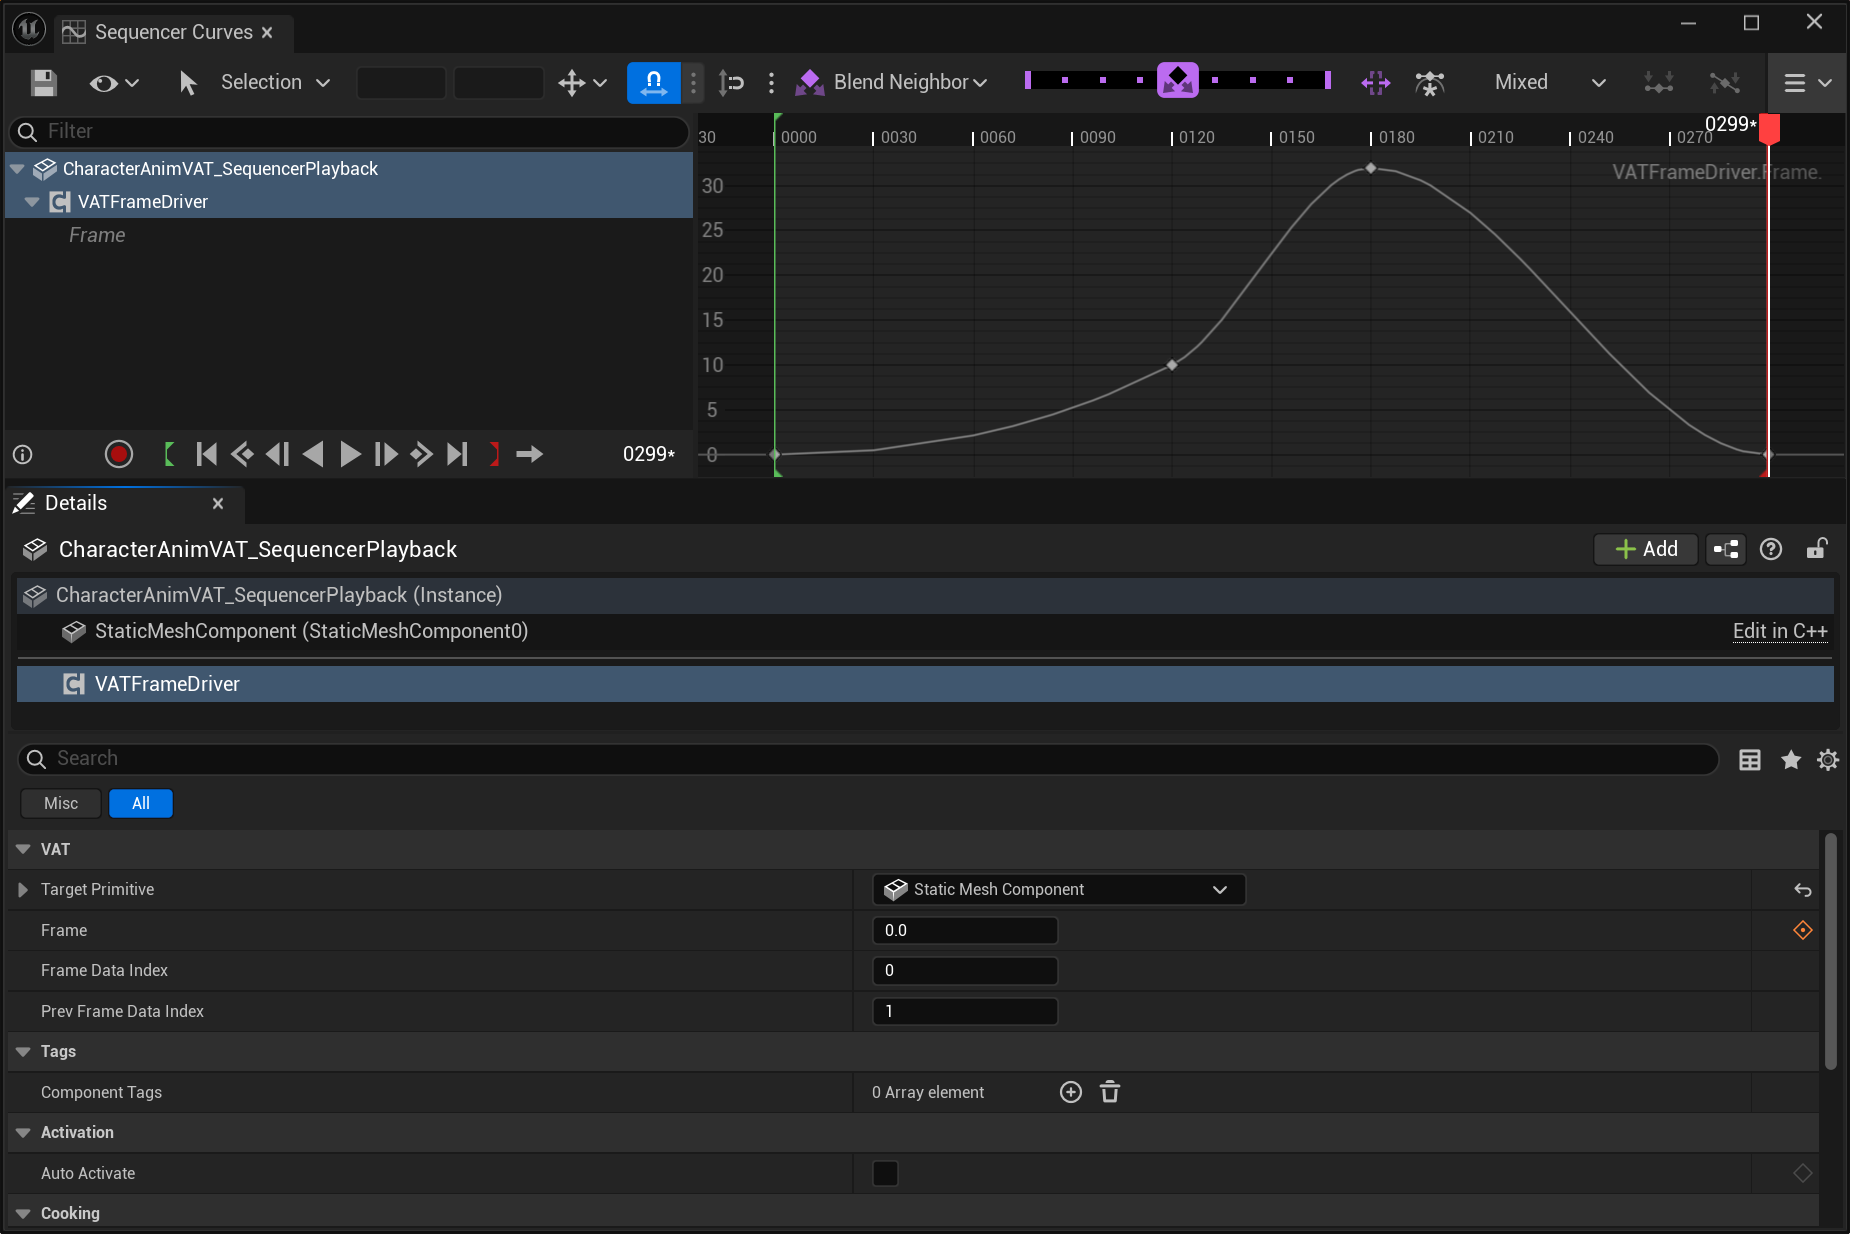
The curve above is the whole point of this approach: Frame eases from 0 up to 30 and back to 0, so
the animation plays in, holds, and reverses out on the shot's timing rather than the material's.
| Property | Purpose |
|---|---|
TargetPrimitive |
Mesh to publish to. Defaults to the actor's first primitive component. |
Frame |
The playback clock, in frames. Keyable in Sequencer, or set from Blueprint with SetFrame. |
FrameDataIndex / PrevFrameDataIndex |
Which custom primitive data floats to write. Default 0 and 1. |
Notes on using it
- One component per animated mesh. If an actor has several, add one each and point them at their
own
TargetPrimitive. - It works in the editor, not just in Play In Editor, so scrubbing the sequence updates the mesh.
- It needs no activation. Leave Auto Activate alone — the component publishes on tick regardless.
- From Blueprint, call
SetFrameinstead of setting the property, so the value is published the moment you set it rather than on the next tick. ResetFrameHistoryforgets the previous frame, so the next one reports no motion. Call it after a teleport or a hard cut, if you ever see a one-frame streak.- The two indices must match the material. If index 1 is already used for something else, change
PrevFrameDataIndexand the corresponding node — they just have to agree.
Instanced (ISM) bakes
This works with Rigid Body (Instanced) too — point Target Primitive at the VAT RBD Instanced component and wire the material exactly as above.
The piece index and the frame number use different systems, so they never collide even though both start at 0. Getting the node type right is the whole trick:
| Input | Node to connect | Index |
|---|---|---|
Frame |
Scalar Parameter, with Use Custom Primitive Data ticked in its Details | Primitive Data Index 0 |
PrevFrame |
The same — a second Scalar Parameter with Use Custom Primitive Data | Primitive Data Index 1 |
PieceIndex |
PerInstanceCustomData | Data Index 0 |
A Scalar Parameter with that checkbox ticked is what draws as the green Custom Primitive Data /
Index N box — there is no node of that name in the palette to search for, which is the usual reason
people reach for PerInstanceCustomData instead.
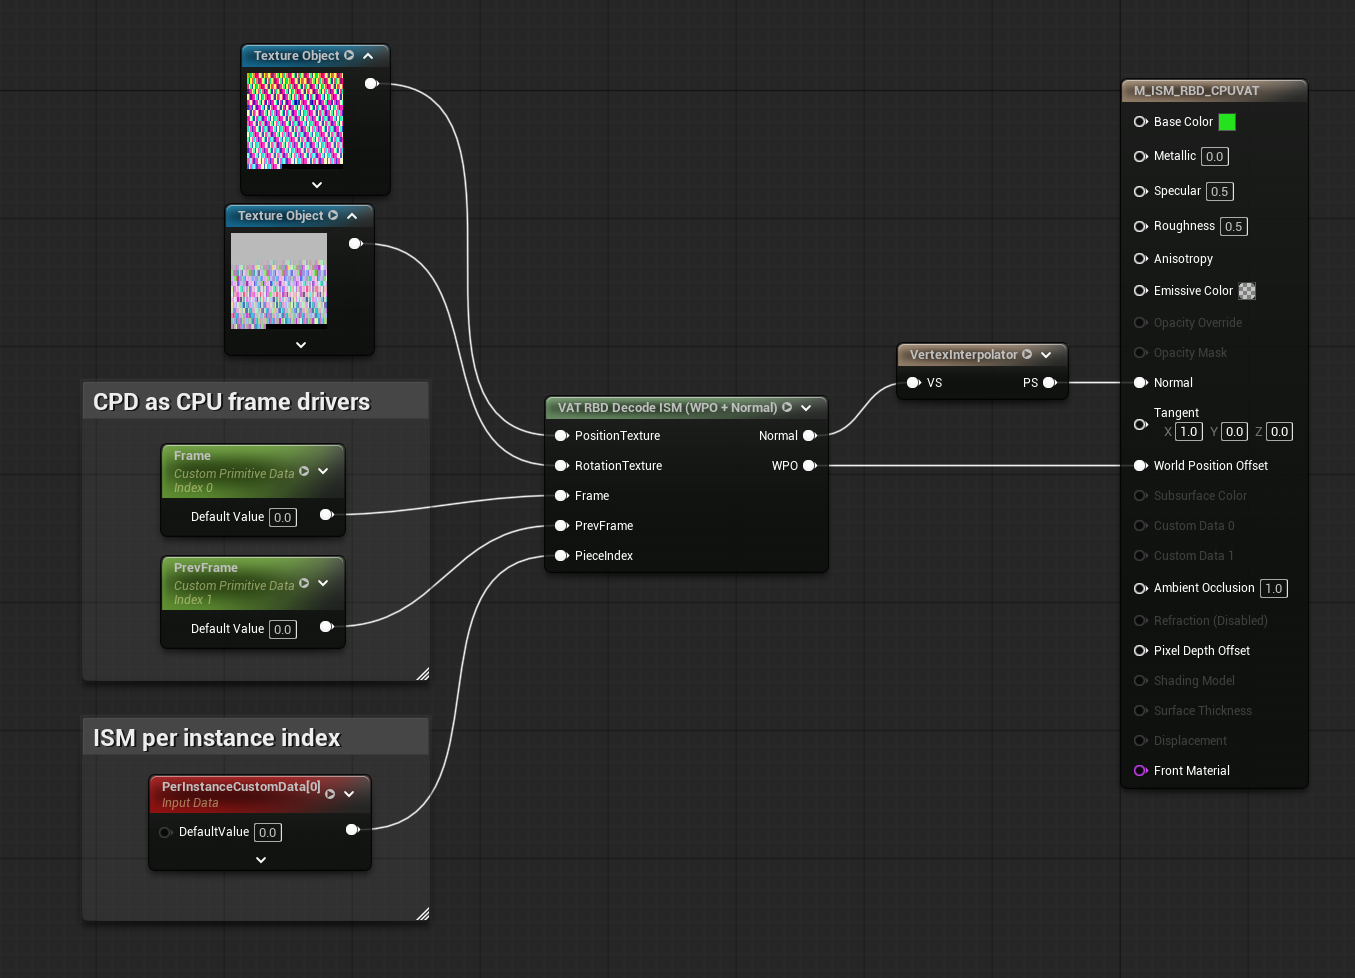
Both groups reference index 0 and both are correct: the green Scalar Parameter reads custom primitive
data slot 0, and PerInstanceCustomData[0] reads the per-instance slot 0.
PerInstanceCustomData will not work for Frame
The frame driver writes custom primitive data; a PerInstanceCustomData node reads the
per-instance payload, which it never touches. Worse, the instanced component allocates exactly
one per-instance float — index 0, the piece index — so higher indices read as zero. The
give-away is the component's Frame value animating while the mesh sits frozen on frame 0.
Every instance shares one frame
Custom primitive data belongs to the component, not to each instance, so all the pieces in one instanced bake play the same frame. That is what you want for a fracture — the pieces are one event — but it does mean the frame driver cannot give instances individual timing. Put them on separate actors if they need separate clocks.
If you rebuild the instance list while the sequence is running and smearing appears, the mesh has
dropped out of the velocity pass; r.Velocity.ForceOutput 1 confirms it.
Why PrevFrame exists
Temporal anti-aliasing needs to know where each pixel was last frame. The engine keeps a previous
copy of Time, so Approach 1 is covered — but it keeps none for custom primitive data, so a
CPU-driven mesh reports that it never moved and smears behind itself, worst while scrubbing.
PrevFrame supplies that history.
It is optional on every node: leave it unconnected for Approach 1, wire it for Approach 2. Cuts, loops and scrubs are detected and reported as zero velocity — there is nothing to tune.
Mixing the two
Both can be used in one level — the material clock for set dressing, the component for the meshes a sequence choreographs. They are per-material and per-actor, so they never interfere.
Switching a material from Approach 1 to Approach 2? Wire PrevFrame at the same time. Without it
the animation still looks right; only the motion vectors are missing, which shows up as smearing.